
How to login to linux over ssh with public key authentication
Today we want to show you how to login to linux over ssh with public key authentication. but when we may use this method?
there is sometimes that you need to login to your server alot of times and every time you should enter username and password. it will be annoying. so here we use a simpler method to authenticate to linux server over ssh.
this method has huge usage specially when you want to setup Ansible for task automation. as you may know public key infrastructure uses two keys. one as private key and another as public key.
the scenario is that we will put our public key on the servers that we login to it and every time we want to login over ssh, it will login automatically.
Here are our environment OS:
Server 1: Cenots 7.1
IP address: 192.168.239.128
Server 2: Centos 7.1
IP address: 192.168.239.129
1- Generate Key
first we should generate private and public keys. so issue the following command:
ssh-keygen -b 4096
-b switch specify number of bits in the key to create. then it will generate public and private keys and also you can enter a password for your private key.
the output will be something like this:
Directory '/root/.ssh'.
Enter passphrase (empty for no passphrase):
Enter same passphrase again:
Your identification has been saved in /root/.ssh/id_rsa.
Your public key has been saved in /root/.ssh/id_rsa.pub.
The key fingerprint is:
92:d9:80:bb:47:11:e5:41:f1:fa:f2:54:36:82:f9:00 root@centos1
The key's randomart image is:
+--[ RSA 4096]----+
| .o=. |
| . o o |
| . E . . |
| . B + |
| . = S . + |
| o . + + . |
| . . . + |
| . + |
| . |
+-----------------+
2- Create required files and directory
now, in every server that we want to login, we should create two files and a directory in home directory of user. for example if we want to login to root account we should create the following:
directory: /root/.ssh/ with 700 permission
files: authorized_keys and known_hosts with 600 permission in /root/.ssh/
be carefull aout permissions. it is so important to set permission rightly, otherwise login process will be failed.
mkdir /root/.ssh/
chmod 700 /root/.ssh/
touch /root/.ssh/authorized_keys /root/.ssh/known_hosts
chmod 600 /root/.ssh/authorized_keys /root/.ssh/known_hosts
3- Copy public key to server
now we have setup things and it’s time to copy our public key to the server that want to login. public key is in /root/.ssh/id_rsa.pub. so copy content of this file to authorized_keys.
vim /root/.ssh/authorized_keys
i will put my public key in it:
ssh-rsa AAAAB3NzaC1yc2EAAAADAQABAAACAQDcmm6MwHj3UF3HG6A/gSA1dvHKt03NnvNjOScyhSKTlMjUriu83um+ZO0JVfjjYg5+a0dCpYO2AVVsWiqsjFTT3c7pMf7ehCgCrHGufmaTACqs1Desko2znQBfKGg0SK93qfqMWllyklMajc0/H1tetkCFyMG+t4723aNfmdvEH9ALziw2Bq4JymfsYZNuI38UNSrLoUpyZ+e7L2XXlUzMfyP6C9bR01yXECZYdzRqKmeoadGnwIuin8wEoM4PP4jPB2gCmT9zqzPSGa/iExmIcIWGA0/0N2AmtX2Eu43WD3CQzVRL2gRv9aJ3Nuwf6XPOpTMaWp5fMW401WmQXe0pAwd5idGjvWdA8OdRZjxpnwXCQ1VFafttGtbcwMtg6x+SZf0WOiguGrFU4NsXJuFW2bBXQECy5ZLoGjCHCiKW+RYXkAjdhZ6MbPnxlCfksE+Jn3CrEhD0de4jR1z93t4cA9hsi0bcYDGLHDxN2LCzSo7t92SLDLq+vKGRI0Rc9WtHcJDoTdPpWlMkA5QgjxkMbILTYIAEWiMTXgW0y92YIHwxU8A/9ni4ABWqhHF/Ing96ZJ3KFLsNCCQWPsHaPnQnkoFVaKUmXKTx8ASNewB9yhl/0q66hyD0so3Lexw0JNbH0jloKhgIF7I8hR7L2OAQ1j26UyIyTiOcCU5PnnXEw== root@centos1
Remember that public key starts with ssh-rsa.
4- Test ssh connection
finally login from server 1 to server 2:
ssh [email protected]
it should ask you from your private key password and after that login in to server 2.
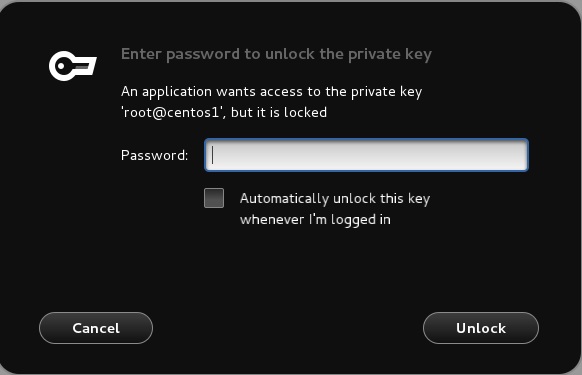
remember that asking for private key password will happen one time until you logout from server 1.
alternatively, you can add your private key to authentication agent if you get the following error:
Agent admitted failure to sign using the key.
so you need to issue the following command:
ssh-add